Monday, March 25, 2013

Spring Cards!

Spring is finally here.  What a great time to make cheery spring cards.  Easter is on it's way.  It's a great time in sharing in the joy of our Faith.  New beginnings are about to start.  Spring Cards will bring joy to those whose receive them.  Have fun as the sunshine starts to melt the winter blues away and the flowers pop up.  
Two different spring cards with the same patterned paper.
 
The embossing folder changes plain paper into a fun background

I used an embossing die to make the pink "flower" the birds are sitting on (above). I layered gold glitter paper on the yellow card stock and finished the card with a  "word" stamp.  The cards are 4x4 ( Cut 4x8).
This card could be for a shower for a wedding or a baby.  The
"two love birds" for a bridal shower or the birds as the parents and
heart as the new baby "the new beginning.  I love the birds in the
nest on the inside of the card.


Before the glitter was added to the beaks and
hearts.
After, the glitter was added to the heart and beaks.


Sunday, March 24, 2013

Butterfly Garden Card With Matching Embossed Background

My husband and boys went to the craft store with me!  This was a really sweet thing for them to do.  I don't think it was there first choice, but they like to see mom/wife happy too.  Well, I did not see this wonder product....my hubby did.  I decided to give it a try and wow it is fun.  The set is an embossing folder for you die cut/embossing machine and a matching stamp set.  I followed the instruction on the box and stamped the image first in a green ink (yes all green) on a green background.  I attached it to the pink paper and then............. I took my new favorite embellishment.........glitter glue pens!  I glitter glued the leaves on the edge only and the flowers I used two pinks to add dimension.  Then, I did the butterfly bodies in green and their wings in purple.  I let dry over night.  When I saw it in the morning, I was amazed on how pretty it turned out.  I added the fuzzy ribbon at the bottom and I am going to add mini buttons (3) to the ribbon.  I want to find the right color.  This card was fairly quick to do.  I made it in under 30 minutes (except for the dry time of the glitter of coarse).  This would make a lovely Mother's Day card.


The embossing folder matches the stamp set.

Reflection

This card means "The Joy of Life".  I found this really cool as I found
out after I made the card.  Do something for yourself every once in a while
is part of the joy of life.
 
Today, I am in a reflecting mood. Our lives can be very stressful. How do we care for ourselves?

Glitter was added to the sunflowers and Smooch was used on the leaves and
fruit to make it pop a little.  I distressed the paper with a sandblock.  This is core
color paper.


I don't always do the best at letting the stresses of life roll off me. Sometimes I have to remember to take of myself; otherwise, I won't be able to take care of others around me.

So this is what I did today! Here is the work of my reflection.

I took some pattern paper by Graphic 45 in both 12x12 and the same 6x6 paper. I cut out pieces I wanted to used and arranged on my card. By using the different size paper, you get different sizes of the same image. It adds depth to your work. My aunt suggested I buy the paper packs in both sizes when available for this reason. I have love the results every time.

Graphic 45 Paper
Finally, I added glitter glue and other embellishments to the card.


After spending even just a few minutes doing something I love, I felt so much better about things. I made something others would enjoy and I found a little peace and quiet. Even if just for the short time......


French Country Paper


Tuesday, March 5, 2013

Cut out flower card with diagonal fold


The portion underneath the
gold butterfly is one piece cut out.
It turn out like lace.  Very pretty. 
I added the white flowers on either
side separately.
The paper I started out with...
                      
My Favorite glitter glue!
The best glue stick ever.
This is great for all projects.
      
I used the Big Bite for the brads
and to punch holes in the
flowers


The card paper was sanded on both
sides to give the distressed look
                
                         I added pearls to the butterfly and flowers

This project was super fun to create. I spent an evening cutting the patterned paper out then gluing it back to the card in different ways. I made the brads by punching the paper and then gluing the paper to a make your own brad I got from Stampin' UP! a few years ago. I added glitter to the flowers in subtle areas to make them pop. After that dried (overnight), I added the pearls (as shown above). The card is a 12 by 5 1/2. Then I cut the top at an diagonal to get the effect you see above. Score you paper at 4 and 8 inches and fold before you glue you piece on to help know where to place things (i.e. brads and such). Have fun and enjoy your creativity!


I love this punch!  This is from the Martha Stewart Collection.  It punches anywhere on the page.  I, especially, like that you can use your punched paper for another card.  I am going to use it for my next card (as I could line up the butterflies) and it looks like they are flying off the card.


I made the brads too.  I used a Stampin' UP! make a brad kit I got a few years ago. I, first, punched, the paper, then I used the glue stick (shown above) to adhere the paper and brad cover together.  I placed three brads on the flowers on the gray side and three on the black ribbon border on the black side.    I added glitter to the flowers to give a little pop!


Shown above is the brad I made with patterned paper.  I attached it to the glitter gold paper, which I tore to give the distressed look.
 

Monday, March 4, 2013

Inspiration

I created these cards, as a swap with my aunt.  We had a lot of
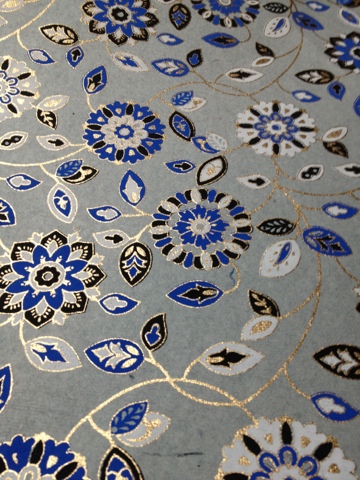
fun.  We both used the patterned hand made paper above and
then sent our finished card to each other.  I will post mine when I
receive it!

Tonight I was thinking about what inspires me.  I came up with a few things.    Inspiration  comes in all things. What ever brings you joy, you should express.  I love to do this through paper crafts.  I find stamping and working with paper is art.  The kind of art I am able to do, anyway. Here are just a few things that inspire to me.

Music brings great inspiration.  When notes are create into melodies, they are art brought to life through our ear and into hearts.  I love to listen to music as I am creating things.  I find when I am deep into a complicated project, I come up with something really beautiful because of the music I am listening to.    The song or type of music will sometimes even bring out the mood of the project. 


My kids bring inspiration.  Their laughter and creativity is amazing.  They have a wicked sense of humor. I have 10 year old twin boys.  They even enjoy scrapbooking.  Their simple  and innocent way of looking at the world inspires me.

My faith inspires me.  I find beauty in all around me.  I see the wonders in our world is and how precious life is to cherish.  This influence how I create things as well.

My work inspires me as well.  I am mother, wife, and nurse.  These are natural care takers roles.  I find this inspires to create things for those I love, however, the art of paper-crafting also takes care of me.  It allows me to relax at the end of a hard day, to get "away" from it all.  I can go off to a peaceful place and let all the cares drift away.  This inspires me.


A picture I took at the beach of my family.  These guys give me lots of inspiration!  I just love this picture.

Tuesday, February 19, 2013

Bird Card Using Embossing Folders

This project uses Cuttlebug embossing
folders on the the black Stampin' UP!
cardstock. 
These cards were made using my Cuttlebug machine, birdcage die, and background embossing folder. I used a hand made paper as the primary decorating accent.

On the birdcage card, I added glitter glue to the background to make a "starry" night.

With the ribbon card, I cut the patterned paper into strips. Then made the ribbon effect. On the inside of the card I added the patterned bird to tie the two cards together.


Bird and Bird Cage were made by sending three paper
through the same die. Then I place in the patterned I thought
was most appealing to the eye.


I used a border embossing folder here.
The embossing folder background has little birds too.

I added glitter to the bird's wing too.


Cutting the paper and adding it to the cards in different ways
was a lot of fun.  My aunt and I do a card swap using the patterned
papers.  These are the ones I came up with this month.


The inside of the card has the patterned bird


These cards would be great for any occasion.


Saturday, January 26, 2013

Creating Cards

I went around my craft room the other day taking pictures of the projects I (and some friends) have done.  Here is some of the samples I saved over the last few years.  I recommend you save a sample back.  This way you can recreate it if you want.  Also, you can see how you have grown over the years in your craft.  I have change my style, color choices, and trends.  However, I love the work I have done and would not change it. As I grown in my hobby, I may get more detailed and learn more complicated things, but I love simple things too.  Sometimes I enjoy making that simple card.  Hope you enjoy looking through the pictures.


The easter eggs used a flower punch. 
The flower card is made with chipboard.  The wedding dress card is watercolored


In the Noel card I stamped it twice and cut the "O" out and adhered it over the orginal "O"
The butterfly is an Arizona Tea Can put through the Cuttlebug Machine. 


One last note, the Easter eggs  (pictured in the first set of pictures) were made for my grandma Nola who loved to collect eggs. I kept one (the pink one) for a sample. After she passed away, I was going through some of her things and found the egg I made her (the blue one). She kept it all these years. Making things for the ones you love is special. She really cherished the simple egg I made. Now, I get to cherish her memory of keeping it every time I look at it now. 

Let's Be Thankful


Here are the Paper Punch Flowers in Thanksgiving Colors.  The fun thing about this project is you can make it for any season!

The Cuttlebug Machine was used to make the flowers and leaves for the table.


Ink the sides of the petals of the flowers for a "vintage" or distress look

Flowers and Fun


My craft room is my favorite place to be in our house.  The kids often spend time with me in there, too!  I wanted to organize my space one day a little more so I "crafted" the magnetic board with a chalkboard decorative rub on and added the "notes" to the chalk board.  I write the projects or things I want to get done as well as store some "extras" in the containers.  The projects pictured below are some of my favorite I did this fall.  My aunt taught me the hows tos during a visit.  The boys and I love making the flowers for different occasions.  They make great party favors or gifts for family, friends, or the kids' teachers. 

I added the chalkboard to the magnetic board (pictured above)  I store embellishments and things in the magnetic containers.


The flower card (lower right) is stamped multiple times on different color papers. 
You then cut and piece it back together for the effect above.

Thursday, January 24, 2013

Grandma's Strawberry Shortcake


This is my favorite spring/summer treat. This is a recipe from my Grandma Bell.   I love this way.  It is light and airy.  It reminds me of family.
Grandma Bell taught my mom this way to make Strawberry Shortcake.  It's The best! ENJOY!


The How To's:
 
Cut Strawberries and sugar as desired.  Place in bowl.
 
Make Fresh Whip Cream
(you can use sugar or sugar-substitute to make whip cream)
 (add about 1-2 tsp vanilla to whip cream for best flavor)
 
Pie Crust Recipe:
2 Cups Flour
1/2 tsp Salt
2/3 Cup Shortening
6 Tablespoon ICE cold water
 
Stir flour and salt in a medium bowl with fork.  Blend the Shortening in with the fork or pastry blender.  Add water to center and stir until blend.  Put into small mounds and  roll out.  Cut to into pieces (does not have to be perfect).  Place on cookie sheet and Bake at 400 degrees for about 10 min or until golden brown. 
 
Layer your Shortcake by starting with pie crust , strawberries, whip cream, and repeat one more time.  I usually make individual plates and serve warm.  You can put in a 9x 13 pan by layering pie crust on bottom, adding berries, then whip cream, and repeat again. ( for a potluck or picnic.  If waiting to serve.  Let the crust cool before stacking the dessert so your whip cream does not  melt)
 
Best served warm!!
Add layers and serve on a warm summer day!

Wednesday, January 23, 2013

Beauty in Butterflies


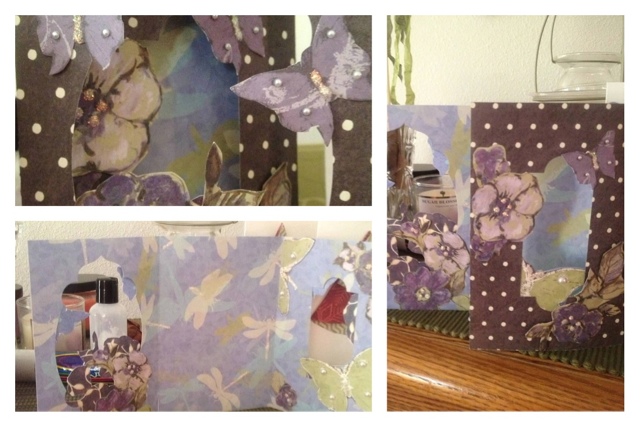
Glue paper pieces and add to card in layers.  Watch your card become art.

This is one of my favorite cards to make.  I used decorative paper.  I cut out pieces and applied to the frame area of card.  To make the "frame", use two different punches or thin-dies.  Finally I added pearls and glitter glue to the flowers and butterflies.  I let and dry overnight and then my card was complete!
As you open this, the card transforms before your eyes!

 Welcome to my Blog: StampGirlCreates by Nola.    I am an independent Stampin Up Demonstrator .  I love paper crafting and inspiring others ...