Monday, March 4, 2013

Inspiration

I created these cards, as a swap with my aunt.  We had a lot of
fun.  We both used the patterned hand made paper above and
then sent our finished card to each other.  I will post mine when I
receive it!

Tonight I was thinking about what inspires me.  I came up with a few things.    Inspiration  comes in all things. What ever brings you joy, you should express.  I love to do this through paper crafts.  I find stamping and working with paper is art.  The kind of art I am able to do, anyway. Here are just a few things that inspire to me.

Music brings great inspiration.  When notes are create into melodies, they are art brought to life through our ear and into hearts.  I love to listen to music as I am creating things.  I find when I am deep into a complicated project, I come up with something really beautiful because of the music I am listening to.    The song or type of music will sometimes even bring out the mood of the project. 


My kids bring inspiration.  Their laughter and creativity is amazing.  They have a wicked sense of humor. I have 10 year old twin boys.  They even enjoy scrapbooking.  Their simple  and innocent way of looking at the world inspires me.

My faith inspires me.  I find beauty in all around me.  I see the wonders in our world is and how precious life is to cherish.  This influence how I create things as well.

My work inspires me as well.  I am mother, wife, and nurse.  These are natural care takers roles.  I find this inspires to create things for those I love, however, the art of paper-crafting also takes care of me.  It allows me to relax at the end of a hard day, to get "away" from it all.  I can go off to a peaceful place and let all the cares drift away.  This inspires me.


A picture I took at the beach of my family.  These guys give me lots of inspiration!  I just love this picture.

Tuesday, February 19, 2013

Bird Card Using Embossing Folders

This project uses Cuttlebug embossing
folders on the the black Stampin' UP!
cardstock. 
These cards were made using my Cuttlebug machine, birdcage die, and background embossing folder. I used a hand made paper as the primary decorating accent.

On the birdcage card, I added glitter glue to the background to make a "starry" night.

With the ribbon card, I cut the patterned paper into strips. Then made the ribbon effect. On the inside of the card I added the patterned bird to tie the two cards together.


Bird and Bird Cage were made by sending three paper
through the same die. Then I place in the patterned I thought
was most appealing to the eye.


I used a border embossing folder here.
The embossing folder background has little birds too.

I added glitter to the bird's wing too.


Cutting the paper and adding it to the cards in different ways
was a lot of fun.  My aunt and I do a card swap using the patterned
papers.  These are the ones I came up with this month.


The inside of the card has the patterned bird


These cards would be great for any occasion.


Saturday, January 26, 2013

Creating Cards

I went around my craft room the other day taking pictures of the projects I (and some friends) have done.  Here is some of the samples I saved over the last few years.  I recommend you save a sample back.  This way you can recreate it if you want.  Also, you can see how you have grown over the years in your craft.  I have change my style, color choices, and trends.  However, I love the work I have done and would not change it. As I grown in my hobby, I may get more detailed and learn more complicated things, but I love simple things too.  Sometimes I enjoy making that simple card.  Hope you enjoy looking through the pictures.


The easter eggs used a flower punch. 
The flower card is made with chipboard.  The wedding dress card is watercolored


In the Noel card I stamped it twice and cut the "O" out and adhered it over the orginal "O"
The butterfly is an Arizona Tea Can put through the Cuttlebug Machine. 


One last note, the Easter eggs  (pictured in the first set of pictures) were made for my grandma Nola who loved to collect eggs. I kept one (the pink one) for a sample. After she passed away, I was going through some of her things and found the egg I made her (the blue one). She kept it all these years. Making things for the ones you love is special. She really cherished the simple egg I made. Now, I get to cherish her memory of keeping it every time I look at it now. 

Let's Be Thankful


Here are the Paper Punch Flowers in Thanksgiving Colors.  The fun thing about this project is you can make it for any season!

The Cuttlebug Machine was used to make the flowers and leaves for the table.


Ink the sides of the petals of the flowers for a "vintage" or distress look

Flowers and Fun


My craft room is my favorite place to be in our house.  The kids often spend time with me in there, too!  I wanted to organize my space one day a little more so I "crafted" the magnetic board with a chalkboard decorative rub on and added the "notes" to the chalk board.  I write the projects or things I want to get done as well as store some "extras" in the containers.  The projects pictured below are some of my favorite I did this fall.  My aunt taught me the hows tos during a visit.  The boys and I love making the flowers for different occasions.  They make great party favors or gifts for family, friends, or the kids' teachers. 

I added the chalkboard to the magnetic board (pictured above)  I store embellishments and things in the magnetic containers.


The flower card (lower right) is stamped multiple times on different color papers. 
You then cut and piece it back together for the effect above.

Thursday, January 24, 2013

Grandma's Strawberry Shortcake


This is my favorite spring/summer treat. This is a recipe from my Grandma Bell.   I love this way.  It is light and airy.  It reminds me of family.
Grandma Bell taught my mom this way to make Strawberry Shortcake.  It's The best! ENJOY!


The How To's:
 
Cut Strawberries and sugar as desired.  Place in bowl.
 
Make Fresh Whip Cream
(you can use sugar or sugar-substitute to make whip cream)
 (add about 1-2 tsp vanilla to whip cream for best flavor)
 
Pie Crust Recipe:
2 Cups Flour
1/2 tsp Salt
2/3 Cup Shortening
6 Tablespoon ICE cold water
 
Stir flour and salt in a medium bowl with fork.  Blend the Shortening in with the fork or pastry blender.  Add water to center and stir until blend.  Put into small mounds and  roll out.  Cut to into pieces (does not have to be perfect).  Place on cookie sheet and Bake at 400 degrees for about 10 min or until golden brown. 
 
Layer your Shortcake by starting with pie crust , strawberries, whip cream, and repeat one more time.  I usually make individual plates and serve warm.  You can put in a 9x 13 pan by layering pie crust on bottom, adding berries, then whip cream, and repeat again. ( for a potluck or picnic.  If waiting to serve.  Let the crust cool before stacking the dessert so your whip cream does not  melt)
 
Best served warm!!
Add layers and serve on a warm summer day!

Wednesday, January 23, 2013

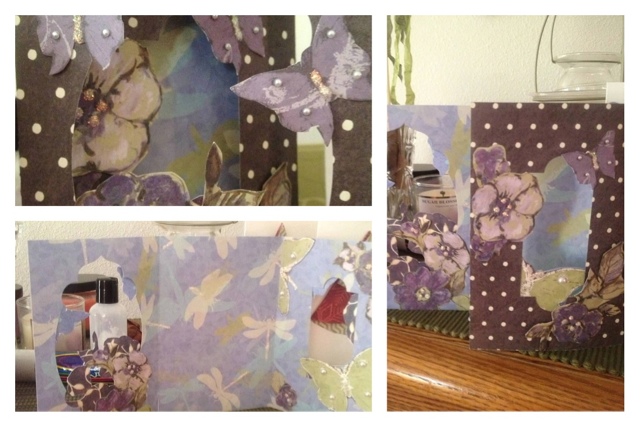
Beauty in Butterflies


Glue paper pieces and add to card in layers.  Watch your card become art.

This is one of my favorite cards to make.  I used decorative paper.  I cut out pieces and applied to the frame area of card.  To make the "frame", use two different punches or thin-dies.  Finally I added pearls and glitter glue to the flowers and butterflies.  I let and dry overnight and then my card was complete!
As you open this, the card transforms before your eyes!

Cake Creations!


I used Wilton's pans to make the Elmo and Firetruck Cake.  The Flower Cake I used a DeMarle' Pan.  The Fire House was done freestyle.  I always use homemade buttercream frosting.  To get the vibrant colors, I used Wilton's solid/gel food colors. 

These cakes were to celebrate birthdays and fun days!  The Elmo cake was one of my boys favorites.  The Firetruck and Firehouse was for their 5th birthday.  My mom did the Firehouse and I did the Truck.   The Flower cake was for a shower.

For my boys 2nd Birthday!  Cake #1
Flower Power!

Baby 6x6 Mini Album


This album is an inexpensive gift you can make for the ones you love.  I made this album out of Stampin' UP! card stock (it was made about 6 years ago and it is still holding up like I made it yesterday).   I cut 12 x 12 down to 6X6 pages.  You can add as many pages as you want.  Plus it hangs on the wall nicely ( on a hook is best). 

The babies pictured are my twin boys. 
To Make this Mini Album, all you need is the following supplies:
 
1. Colorful Card Stock (cut to 6X6)
2. Background Stamps
3. Letter Stamps
4. Punches
5. Ribbons
6.  Adhesive
7.  Office hinge ring to adhere album
8.  Pictures
9.  Journal Pens
 
Stamp your background onto your papers and apply your layout as desired. Punch hole in left corner and place ring.  Tie multiple ribbons on ring to give less of an "office" look.  The nice thing about this album is you can add pages later as you want.


Family Memories Wall Scrapbook

You don't have to do a whole book to scrapbook. Try starting with one or two pages for a wall grouping. Then, change the pages, as you scrapbook more. Insert the "older" pages into an album. Before you know it, you will have a whole album of memories. Below I used a magnetic scrapbook frame to hold my 12 by 12 page and a 12 by 12 clipboard found at a local craft store


Mini Album Wine Themed

This handmade mini album uses decorative papers, inks, and card stock stickers.

1. Cover the album with paper using a book binding glue or strong bond adhesive.

2. Cut individual pages using different papers

3. Cut embellishments and adhere to your pages.

4. Journal or add photos as desired.


 Welcome to my Blog: StampGirlCreates by Nola.    I am an independent Stampin Up Demonstrator .  I love paper crafting and inspiring others ...