
Sunday, December 30, 2012
My newest craft gadget!
This is what I got for Christmas! It set brads and punches holes with ease. I have the smaller version and love it. This one will be great for big pieces of paper as I can punch into paper now 6 inches.
Chocolate Decadent Cake
This yummy creation is a holiday party favorite at our house. My friend gave me this recipe a while back. It never disappoints. It is best served with a touch of vanilla ice cream or whip cream. See below for the recipe. Enjoy!

 |
| Pour the chocolate ganache over the cake after the cake cools for about 10- 15 minutes. |
 |
| Serve slightly warm or cool. It tastes yummy no matter what! |
 |
| Sifting powder sugar on top makes it complete to serve |
Recipe:
Chocolate DecadentCake Recipe
Preheat oven to 350 degrees. Baketime: 40-50 minutes or until pulls from edges and cake tester come our clean.
Ingredients Needed:
1 Cup boiling water
3 oz unsweetened chocolate (cubes)
8 Tablespoons butter
1 tsp vanilla extract
2 cups granulated sugar
2 eggs separated (you will use yolk and whites)
1 tsp baking soda
½ cup sour cream
2 cups flour
1 tsp baking powder
1 tsp baking soda
½ cup sour cream
2 cups flour
1 tsp baking powder
1. Pour boiling water over chocolate andbutter. Stir until melted.
2. Stir in vanilla and sugar.
3. Whiskin egg yolks.
4. Mix baking soda and sour cream and whisk intochocolate mixture.
5. Sift flour and baking powder together. Add to batter and stir.
6. In separate bowl beat egg whites until stiff(but not dry). Fold into batter.
7. Pourinto grease/floured 10 inch spring form pan and bake until edges pull slightlyaway from sides and tooth pick/ tester comes out clean.
8. Cool10 minutes then unmold. Wait until the cakecool before pouring on Ganache.
Chocolate Ganache
Ingredients:
2 Tablespoonsbutter
¾ cup semisweetchocolate chips (I use dark chocolate chip sometimes)
6 Tablespoonscream (fresh whipping cream)
1 ¼ cup poweredsugar sifted
1 tsp vanilla
Melt allingredients over low heat in a saucepan. Cool slightly. Pour and spreadover cake.
Friday, December 28, 2012
Sprite Pop Can Christmas Tree
This is made with a die cut using my Cuttlebug machine. After washing your pop can out, cut it open into "paper". Then, center the can so the Sprite logo with be down the tree. Take a star punch and punch the lemon part of the can. Adhere the the star to the tree.

Thursday, December 27, 2012
3D Stamped Artwork!
 |
| This was done on an 8X8 Canvas with stamps from Stampin' UP! and pigment ink. |
 http://pinterest.com/icnern99/ http://pinterest.com/icnern99/ |
| The pigment ink has not faded over time. I had to allow for drying between the layers. It took about 10 hours to get really good results. You could use a heat tool if desired (caution not burn project) |
This piece I created out of a stamp set that made me thinks of impressionism art. I have never been able to paint, however love canvas and creating. My husband, who is a great at art, said one day " You should try your hand at canvas with those stamps. I think you can do something cool with it". This is what I came up with. Using pigment ink and rubbing it directly on the canvas I got the background colors. Then I used the pigment inks to stamp the canvas with my flower set. I love how it turned out and made a piece for a family member. They all turn out truly different. It is my kind of art. I created this piece back in 2004. This piece is called "flower delight"
 |
| I have personalized stamp to sign my creations. I still sign them by hand at times like I did on the front of this piece. |
 |
| The sides have a light purple color. |
 |
| Bold stamp sets work best on canvas |
Thank You Flower Card
 |
| This card uses punches, stamps, and embossing folders. |
This is a fun little card to make for a friend to say thank you. It is cheery and easy to do. You need you start out by cutting your paper into the desired dimensions you want your card. Next run your background paper through an embossing folder plate. Then, punch part of the flower in the upper side (either works). Build your card up as follows: main card, design paper background, embossed paper (adhere this one with dimensions or glue dots to give a lift affect). This will make the punch flower stick out. Finally adhere you punch flower and stamped "thank you" . Add ribbon for leaves and brads for details.
 |
| Try positioning the flower in different places. See where you like it the best. |
Merry Christmas
I hope everyone had a very Merry Christmas. Our family enjoyed the holidays. I started this blog to share some of the ideas I created in my spare time. As you know, many of us do not have enough of that! I find making paper projects and decorating yummy things for others to enjoy is relaxing and fun. I hope you find inspiration and great ideas to share and try. I can't wait to post my next project. See more of my projects at my pininterest page http://pinterest.com/icnern99/.
Have a wonderful New Year!
 |
| Pattern Paper hand cut to make inside design |
 |
| Butterfly made using a die cut machine |
 |
| Inside view of card |
Tuesday, December 25, 2012
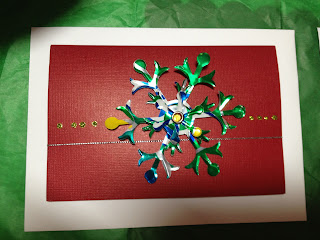
Pop can snowflake cards!
These were made for Christmas out of pop can (soda cans). See instructions in last post (butterfly). No two snowflakes are made from the same can, just like no two snowflakes are the same.
 d.
d.
 e.
e.
 f.
f.
 g.
g.
 h.
h.

 |
| Can you guess which pop can I used? Try to on each individual card below. Remember, I did not use any pop cans twice! Leave me a comment below and tell me how many you got right! Have fun! |
 a. a. |
b.  |
c.  |
d. e.
e. f. g.h.
How MANY do you think you got RIGHT?? Hint: Some may not be regular soda pop. Think outside the box on at least one. All are name brands. Good luck.
Answers: a. Cherry Coke b. Sprite Zero c. Sierra Mist Natural d. Dr. Pepper e. Sprite f. Coke
g. Diet Coke h. Monster Enegry
g. Diet Coke h. Monster Enegry
Sunday, December 23, 2012
Coke can butterfly card!
This card was made with a soda can. Lots of fun. First, you take a pop can and wash it. Next, after it is dry take a knife a punch a whole three times at the top by the where the can starts to bend down. This is the thinner tin. Cut open and throw away top. Cut down side of can. Then cut around bottom and throw bottom away. Now you have a " piece of tin paper". Be very careful not to cut yourself throughout this process. The edges will be sharp! Send your "paper" through a die cutting machine and there you have it a beautiful card. I used a coke can and a sprite can underneath for the wing. Try any can for different affects!
 |
| This butterfly is made with a Coke can and a Sprite can under the left wing for special effect. I used another Coke can for the right wing layer |
Subscribe to:
Comments (Atom)
Welcome to my Blog: StampGirlCreates by Nola. I am an independent Stampin Up Demonstrator . I love paper crafting and inspiring others ...

-
 This card was made with a soda can. Lots of fun. First, you take a pop can and wash it. Next, after it is dry take a knife a punch a whole t...
 -
 This gift card is for a shower I am going to soon. I added the heart with the ribbon to make the "nest". To make this card: I c...